


The Vector to 3D Figma plugin is a powerful and innovative tool that revolutionizes the design process by seamlessly converting 2D vector graphics into captivating 3D objects directly within the Figma design tool. This step-by-step guide will walk you through the process of using the plugin.
Step 1. Sign up with Email Address/Google Account:
1.1 Go to Figma.com and click on "Sign up" in the top right corner, or use this link:

Sign up with your Google account or use your email and create an account if you haven’t got one. And your Figma account will be completed within seconds.
Step 2: Select Nodes
2.1 Open your Figma project and navigate to the specific artboard or frame where you have the 2D vector graphics to transform into 3D objects.
2.2 Use the Figma selection tool to select the nodes (shapes, paths, or vector elements) you want to turn into 3D objects. You can select multiple nodes simultaneously by holding the Shift key while clicking on them.
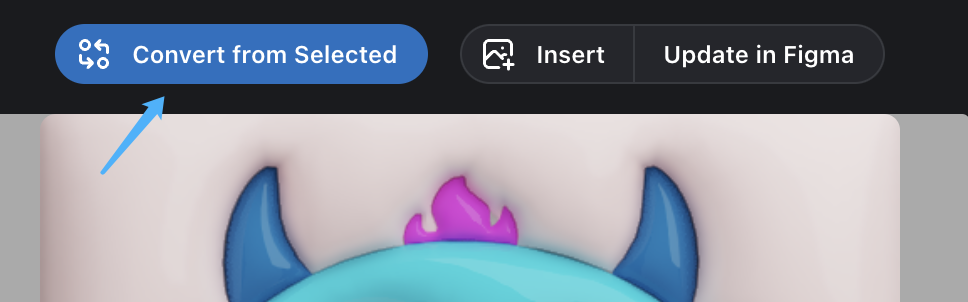
2.3 Once your desired nodes are selected, the Vector to the 3D plugin will automatically detect and save your selection for later use. If you want to change your selection, you can click on the "Convert from Selected" button located on the top left of the plugin interface to make adjustments.
Step 3: Choose 3D Effect
3.1 In the Vector to 3D plugin interface, you'll see options for choosing between two mesmerizing 3D effects – "Extrude" and "Inflate."
3.2 Select the "Extrude" option to create 3D objects with visually striking, hard-edged meshes. This effect will give your designs a more solid and angular appearance.

3.3 Alternatively, choose the "Inflate" option if you prefer a smoother, balloon-like appearance for your 3D objects. This effect adds a touch of whimsy and softness to your designs.

Step 4: Configure Overlapped Layout
4.1 The plugin offers two options for configuring the layout of overlapped parts in your 3D arrangement – "Stack" and "Clip."
4.2 Select the "Stack" option if you want your 3D objects to be stacked on the z-axis. This will create a visually interesting arrangement where things appear on top of each other.
4.3 Choose the "Clip" option to clip the overlapped parts of your 3D objects. This is useful when creating intricate and complex 3D arrangements with smooth transitions between objects.
Step 5: Adjust Stack Gap
5.1 Using the "Stack" layout option, you can further refine the spacing between the stacked objects using the "Stack Gap" setting.


5.2 Use the slider or input box provided in the plugin interface to adjust the stack gap. Increasing the gap will add more space between the stacked objects while reducing it will make them closer together.
Step 6: Set Color and Roughness
6.1 With the Vector to the 3D plugin, you can set the color and roughness of your 3D objects, allowing you to customize each element to align perfectly with your design vision.
6.2 Click on the color swatch in the plugin interface to open the color picker and choose the desired color for your 3D objects.
6.3 Use the roughness slider to control the level of surface roughness on our 3D objects. Higher roughness values will result in a more textured appearance, while lower values will make the surfaces smoother.
Step 7: Adjust View Size
7.1 Properly adjusting the view size is crucial to ensure your 3D objects cast shadows correctly and fit within the canvas.
7.2 In the Vector to 3D plugin, you can effortlessly adjust the view size using the provided controls. This allows you to have full control over the dimensions of your 3D creations and achieve the desired composition.
Conclusion
Following these steps, you will successfully convert your 2D vector graphics into captivating 3D objects using the Vector to 3D Figma plugin. Now, you can experiment with various settings, lighting, and arrangements to create stunning 3D designs directly within Figma.
Don’t forget to join our AI Tools SubReddit, Twitter, and Facebook Group, where we share cool AI projects and more. If you have any questions regarding the above article or if we missed anything, feel free to email us at Asif@marktechpost.com

